If you are here reading this you have probably logged into the Elits portal for the first time, so you allow me, first of all, to say welcome! The most fundamental goals of the portal are to help you manage your computing resources. So the focus of thus guide will be to get your first server or virtual machine up and running. When launching a server, there are many different options that can be considered and we will discuss them briefly here and provide you with useful links to documentation where you can learn more. If you have not yet logged into the portal, please visit my.elits.com and log in using the credentials provided to you from ELITS.
Lets get an Overview
Once logged in the first thing we will see is the overview page.

At the bottom of this page, you can see some charts that displays your usage of the most common resources available in MyELITS. Most importantly is the sidebar menu to the left, from this you can navigate to different pages where you can view information and manage the resources available in the portal. You are currently looking at the page Start > Dashboard. As seen in the overvire charts you are hardly using any of the resources in your quota, now in the sidebar menu navigate to Infrastruture > Servers > List Servers, so we can start spinning up the server.
Launch server wizard
The the moment, there is not that much to see there.

With no servers created, our list of server is, of course, empty. Now hit the button labeled Launch Server to start the Launch server wizard. Depending on which region is chosen in the top menu the server (-s) will appear in a specific region and the availability zones for each region (more on availability zones below).
Details

Server Name
The name of the server, this will also be set as the servers hostname.
Availability Zone
Currently there are two available zones to choose from, Linkoping1 or Linkoping2 (or Stockholm1 and Stockholm2 if you are setting up server(-s) in Stockholm region), you can choose either one. All of the compute nodes in our environment is split up between these two zones, so if you put two servers in different availability zones you will make sure that they end up on separate hypervisors.
Count
How many servers would you like to create? The servers will be duplicated except for; private IP-addresses (Public addresses are allocated separately), Name and Hostname. Name and Hostname will be appended with -1, -2, -3 and so on.
Source

Select Boot Source
What boot source do you want to use for your server? The interesting option for now is "image". Next to boot Source is a switch for creating or not creating a new volume. If a new volume is not created, you servers will be created on disk on the local hypervisor on which your server is running. This allows for very fast reading/writing to the disk, but there is only one copy of it. Choosing to create a new volume will create your servers disk on the clouds storage cluster. This option is not as fast in terms of reading/writing to the disk, but instead there will always be kept three copies of your servers disk. For more detailed information, see Server boot source.
Volume size
If "Created New Volume" is chosen you get the opportunity to chose a name for the device (a standard name will be suggested by the system). This is the name that will be shown in the list over volumes.
Name
This is the template for you server(-s). If "Create New Volume" is not chosen, the disk size will be that one of the flavor (more on Flavor below). If "Create New Volume" is chosen the size specified by you will have to be at least the size of the template (Name).
Flavor

The flavor decides the size of the server, in other words, many CPU cores, how much RAM and disk space that the server will have. There is a predefined set of flavors available in the portal, and you can view their details by simply choosing one in the drop-down menu. When you change the flavor selection you can see how the size of the flavor relates to your quota under "Project Limits". In other words, if you have enough resources left to use the chosen flavor for your server. If "Create New Volume" was chosen before the disk size no longer is in effect, instead the size is chosen under "Source"
Name
Choose an image that should be used for your server. You have some images to choose from and I would recommend one of our Ubuntu or Window Server 2012 images. To view more information about the available images, visit Infrastructure > Servers > Images.
Now we can take a look at the option on the second tab, called "Networks".
Networks
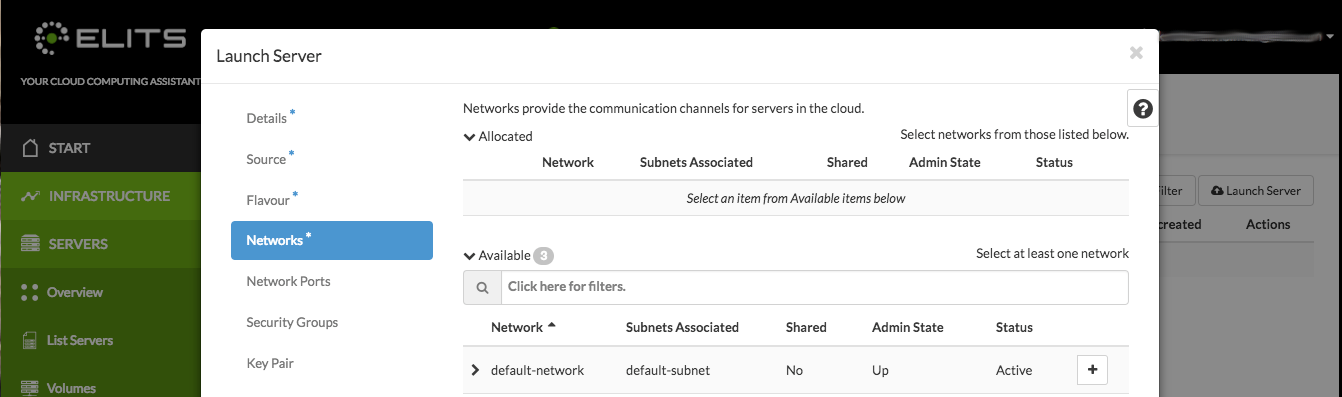
Allocated networks
Select the new networks to which you want to connect your server. As of now you will only have one network available, the default network.
Security Groups

Network access to your instance is managed through security groups; each security group is a collection of firewall rules. The security groups that are available to you from start are quite simple, and they allow incoming and outgoing traffic for a specific common port and they can be combined to allow multiple ports. To keep things simple, we select the SSH security group for Linux servers and RDP for Windows servers (add by clicking on the + sign). This allow access to the server /besides the console which always is available). Later on you can add security groups needed for the specific service on your server(-s).
If you want to read more about Security Groups, I would suggest reading Configure access and security for instances.
Key Pair
This setting is only relevant to the Different Linux images, this allows you to upload and inject a public SSH key into the server when it is created. Making it very easy for you to later access the server using SSH. If you have a public SSH key that would like to use, click "Import key pair" to import into the portal. On the new window that appear you need to choose a name for the key and write down or paste the actual pubkuc key. To later create or edit you Key Pair, visit Infrastructure > Servers > Access & Security and the Key Pairs tab. It is not necessary to inject an SSH key to finish this tutorial as long as you set username and password (below under Configuration).

Now if you want to read more about Key Pairs, I would suggest reading Configure access and security for instances.
Configuration
If you decided to create an Ubuntu Server, i want you also to take a look at the fourth tab called "Configuration"

On all images available in the ELITS portal, there is a client program installed called cloud-init. On this tab, you can send data or even script data to be processed by this agent when your server is created. We are now going to use this to set a password for the default user on our new Ubuntu Server. If you are setting up certain flavors of Linux you can type a username and password directly into corresponding boxes. For other Linux flavor you have to create a small script, see below.
Load script from a file (click advanced to show this option)
Would you like to upload a script file that you have on your desktop? Then this is the option. If you want to type it directly into the web browser, use Customization script text box.
Customization script (click advanced to show this option)
Here you can directly type the data that you want to pass to cloud-init. To set a password on a Ubuntu image, paste the data shown below into this field and adjust "mypassword" to a password you wish to use.
Script data cloud-config
#cloud-config
password: mypassword
chpasswd: { expire: False }
That's it
Those are the tabs that you need to look through to create a server, now you can go ahead and hit launch to actually create the server.
Login
- Windows: password will be forced to be set at first login in console. Login at console the first time.
- Linux: SSH key, username plus password or both need to be set. See Key pairs and Configuration above.
To open a console for your server, go to Servers > List Servers > Actions, and click on the drop-down button and choose "Console".
![]()
Except where otherwise noted, this document is licensed under Creative Commons Attribution 3.0 License
Changes were made based on the original Openstack User guide
Comments
Article is closed for comments.